How to restore an old photograph
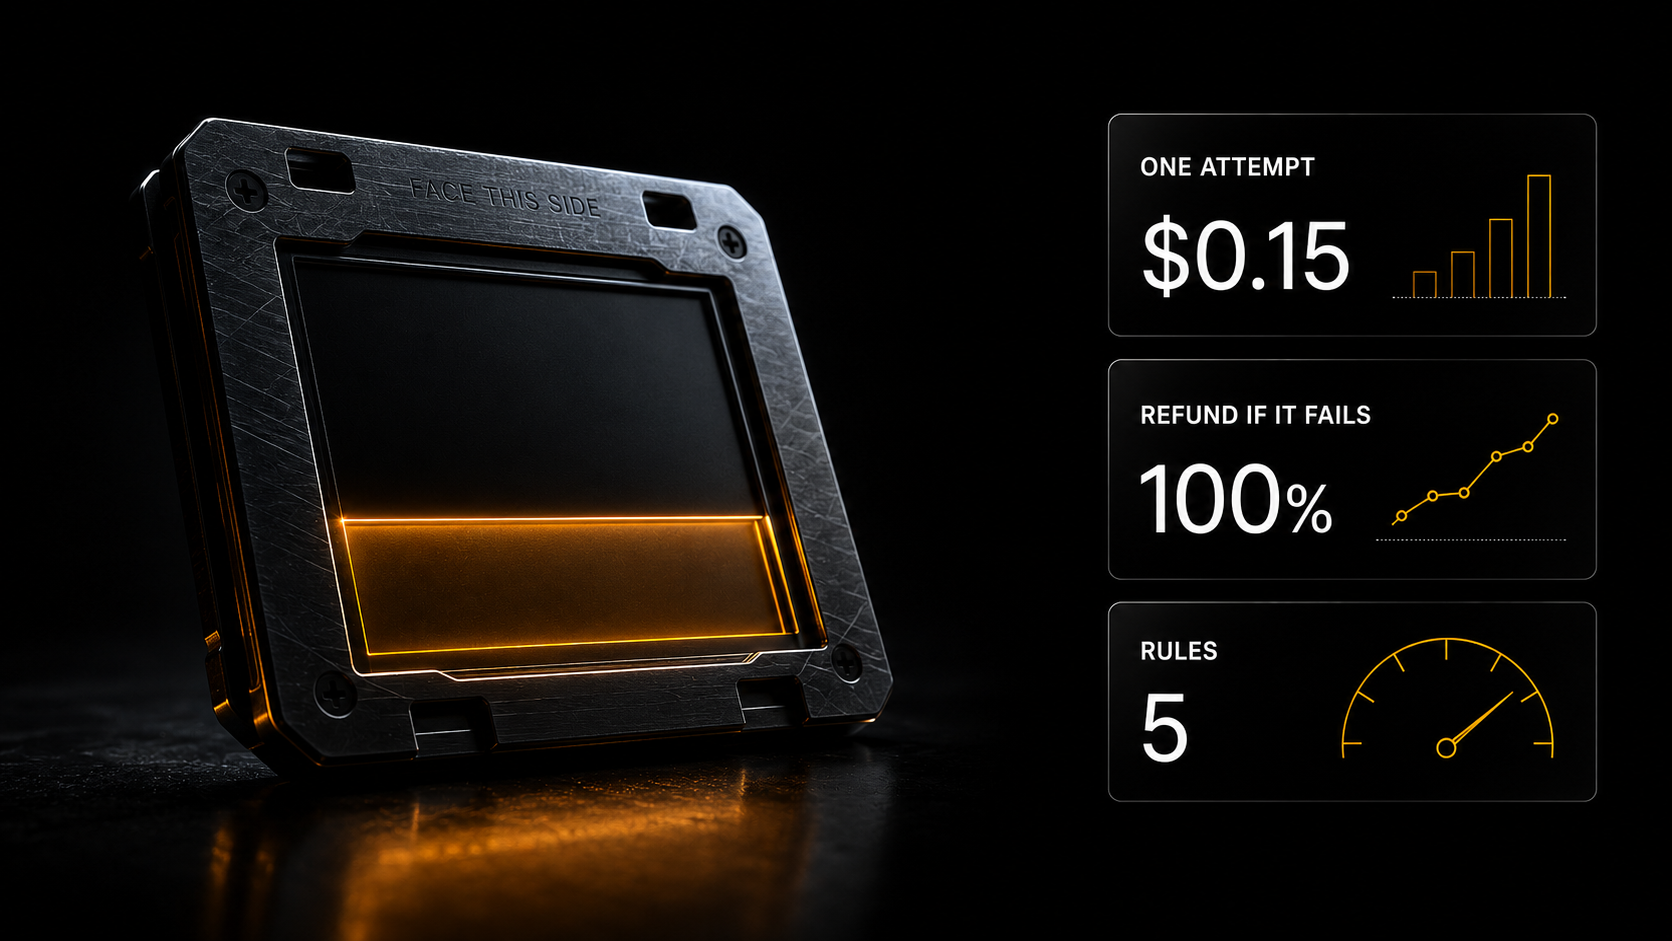
Every home has a photograph too precious to lose: creases, scratches, everything gone yellow. The main fear in restoring one is that the face will become a stranger's. Below is a breakdown of a real run and exactly what removes that fear.
Every home has a photograph too precious to lose: creases, scratches, everything gone yellow. The main fear in restoring one is that the face will become a stranger's. Below is a breakdown of a real run and exactly what removes that fear.
---
If there is no time to read: five steps
1. Photograph the print on your phone in even light, with no glare and no shadows from your hands. A scan is better, but a photo will do.
2. Do not write the request yourself. Give the photo to an assistant and ask it to compose the request for you.
3. The main thing in the request is the prohibitions, not the wishes: do not change faces, do not change expressions, do not smooth the skin.
4. Check the face close up rather than the overall look. If the person is still themselves, it worked.
5. One attempt costs about $0.15, and if it did not work the money comes back.
---
Why photographs like this sit untouched
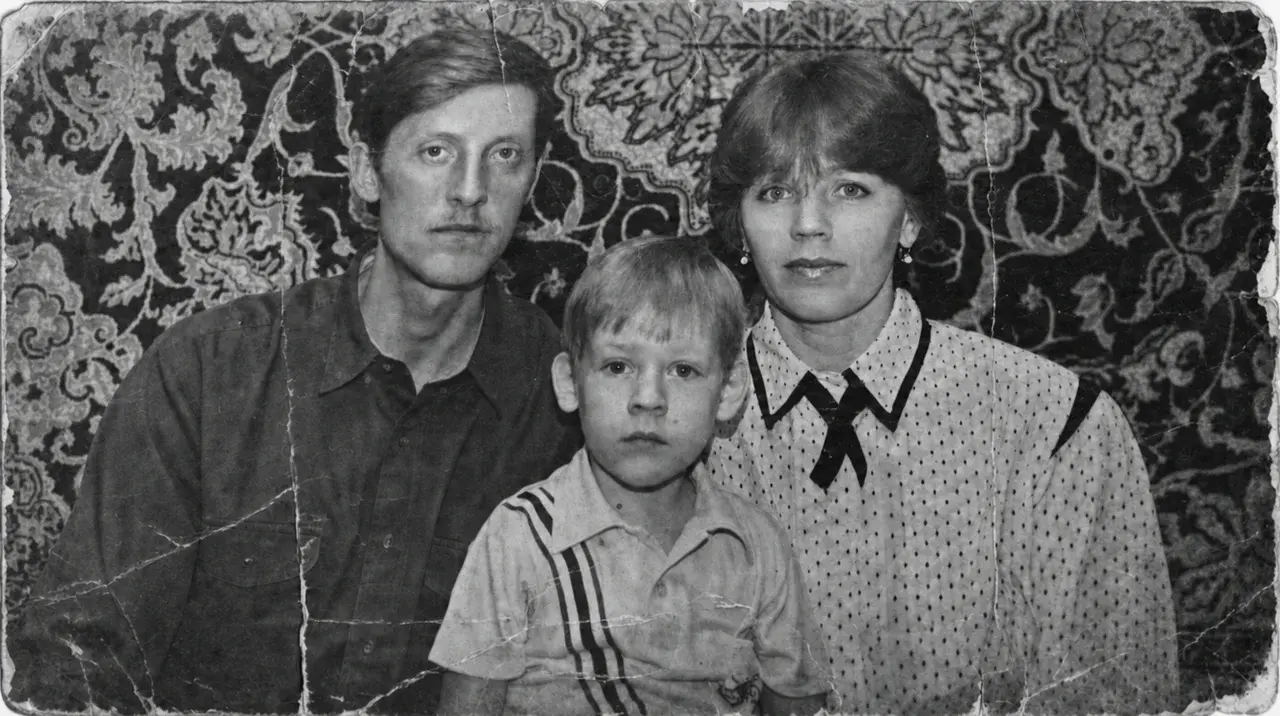
A photograph from a family album. A father, a mother and a son against a rug — an ordinary domestic shot taken with a flash many years ago.
Over the years everything has happened to it at once. The paper has yellowed so far that hardly any colour is left. Creases have appeared from being folded. Small scratches and dust all over the surface. The flash bleached the faces, and the background has gone to a murky sepia.
Taking it to a restorer feels a shame and a bother — money, a journey and a wait. And most of all, you have to hand the print over to somebody, and there is only one of it.
So the photograph just sits there. Not thrown away, not restored — for years.
Meanwhile restoration takes a few minutes and is done from a phone. Below is exactly what I did.
---
Who I am and which photos I restored
I have been working with AI for five years, since 2019.
What follows is a real run on one photograph. I show both frames, before and after, and most of all what was written in the request, because that is where everything is decided.
The original
---
The main fear: the person becomes somebody else
Before going through the steps, let me address what stops most people.
A restored photo often looks worse than the original. Not technically — technically everything is clean: no scratches, colour restored. But the person in it is not the same.
The skin has gone plastic, as in a face-cream advert. The wrinkles have gone along with the age. The smile is slightly wider than it was. The gaze is friendlier.
And that is the galling part. You restored the photograph to preserve a person and got a stranger who looks like them. With an ordinary photograph that is unpleasant. With a photograph of somebody who is gone it is unbearable.
The problem is not the technology but the request. "Restore this photograph" is understood by the model as "make it look nice", and nice in its understanding means smooth, bright and smiling.
That is solved with a list of prohibitions. And here it gets interesting.
---
Step 1. An assistant writes the request
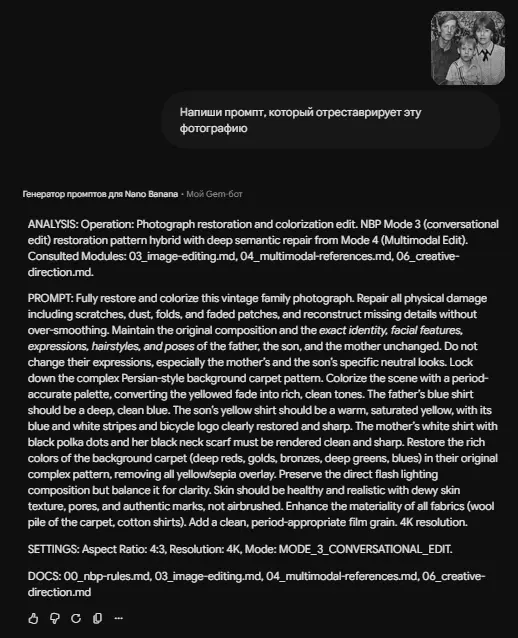
I did not compose the request myself. I opened a prompt assistant, uploaded the photograph and wrote one line:
> "Write a prompt that will restore this photograph."
That is all. Nothing else was required from me.
It then analysed the photograph and composed the request itself — two thirds of it prohibitions.
---
Step 2. What it wrote and why that matters
Here it is worth pausing, because the assistant took account of things I would not have thought of.
It protected the faces with a separate clause. Not just "preserve the faces" but: preserve the exact identity, features, expressions, hairstyles and poses of the father, the son and the mother unchanged. And separately — do not change the expressions, especially the neutral gazes of the mother and the son.
It looked at the photograph and noticed they are not smiling. And explicitly forbade the model to "improve" them.
It forbade smoothing the skin. Word for word: the skin should be healthy and realistic, with texture, pores and real marks, rather than retouched.
It fixed the rug's pattern. A complex ornamental design in the background — exactly what a model will happily redraw in its own way. It required the pattern to be preserved as it is.
It set out the colours item by item rather than in general. The father's blue shirt — a deep clean blue. The son's yellow shirt — warm and saturated, with the blue and white stripes and the bicycle logo restored sharply. The mother's white shirt with black polka dots and her black scarf — clean and crisp. The rug — deep reds, golds, bronzes, greens and blues, with no yellow cast.
And it added film grain — so the photograph stays a photograph of its time rather than looking like a modern digital picture.
That is the difference between "restore this photograph" and a request like that. The first gives you a handsome picture. The second gives you the same photograph, only without the damage.
---
Step 3. Generation
I copied the finished request and pasted it into the generation section — Gen AI, the "Photo editor" mode, the GPT Image 2 model, high quality.
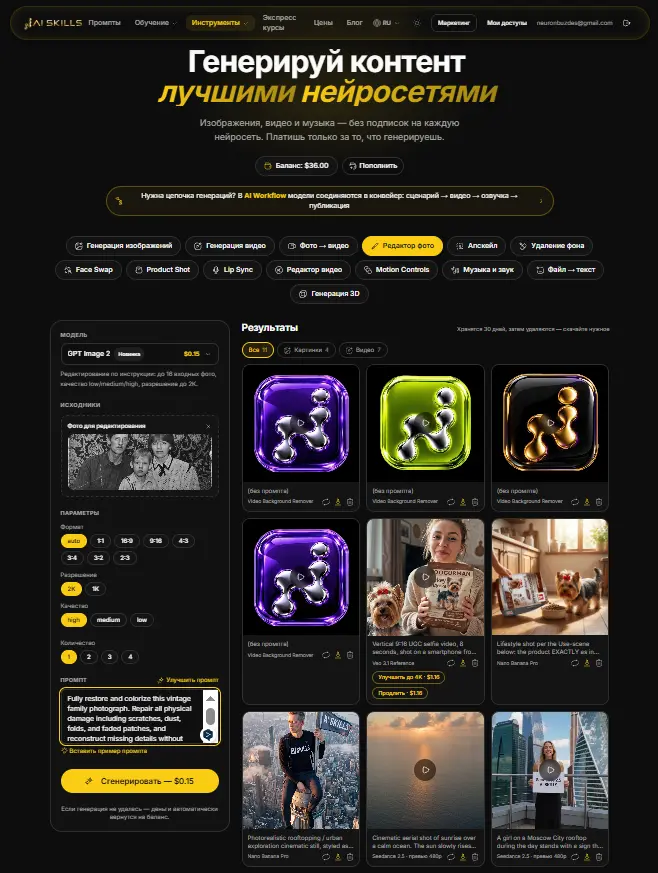
The cost — $0.15. The price is visible before you press. If a generation did not work, the money returns to the balance automatically.
The result
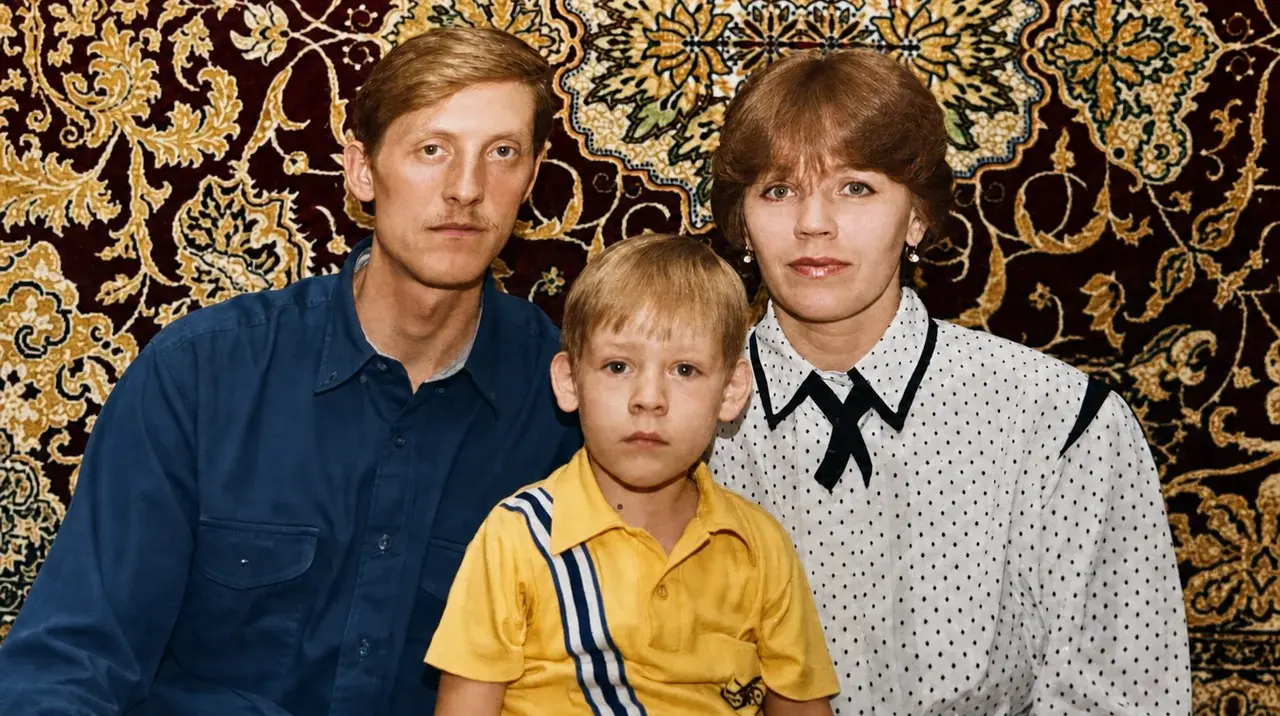
Open both frames side by side. The scratches and creases are gone, the yellow cast has disappeared, the rug has its colours back. And these are the same people with the same faces and the same expressions.
Results are kept for thirty days — download them straight away.
---
What to look at when judging the result
Not the overall look — the overall look almost always improves. Look at four things.
The face close up. Enlarge it and compare with the original. The shape of the nose, the set of the eyes, the line of the mouth. If something has shifted, do it again.
The expression. Was serious — is it still serious? That is the point the model breaks most often.
Age. Wrinkles and lines are part of a person rather than a defect in the print. If a face has grown ten years younger, that is no longer them.
Small details of clothing. Patterns, badges, lettering on a shirt. They show whether the model restored the photograph or redrew it from scratch.
The rule is simple: if even one of the four does not match, that is not the same person and the photograph has to be done again.
---
How to photograph a print with a phone
A scan is better, but most people have no scanner. A phone will do if four things are observed.
Even diffuse light. By a window in daytime, but not in direct sun. No flash — it puts a glare in the middle of the frame.
No shadows from your hands or the phone. Hold the device to one side of the light source rather than between it and the print.
Parallel. The phone directly above the photograph rather than at an angle — otherwise the frame skews and the model will be correcting perspective instead of damage.
The whole print in frame. Cropped edges are not reconstructed correctly.
If the photograph is under glass or in a frame, take it out. Glass gives reflections the model will take for part of the image.
---
What to do if the photo was restored badly
The face changed. Tell the assistant directly: "the previous result altered the facial features, add a strict prohibition on any changes to faces and expressions". It will reassemble the request.
The skin went plastic. Ask for this to be added: visible skin texture, pores, natural marks, no retouching.
The colours are unnatural, like a colouring book. Specify the era and character of the shot: "a palette appropriate to the time it was taken, muted, with no acid tones".
The background pattern was redrawn. As a separate clause: fix the background pattern with no changes.
The general rule: do not rewrite the request yourself. Tell the assistant what went wrong — correcting the wording is its job.
---
What else can be done with the same photograph
Restoration is the first action. Several more things come out of the same frame.
Remove an unwanted object — a finger in the corner, a stranger, some lettering.
Increase the resolution for printing. An old print is usually small, and for a wall you need it large.
Split a group photo into individual portraits.
And animate it. From a still frame you can make a short video with slight movement — the person blinks, turns their head a little. For a family archive that is a separate experience, and it is done the same way: the assistant writes the request, you generate.
The generation section has separate modes for all of it — photo editor, upscale, background removal, photo to video.
---
And what I did not do myself
Let me come back to the main point.
I did not write a single word of that request. I uploaded the photograph and asked for a prompt. Everything else — including the clause about the neutral gazes of the mother and son, which I would never have thought of — was done by the assistant.
There are more than 150 of them in the catalogue, across fourteen sections: for every task and every model.
Access is the basic subscription.
And the prompt library holds ready templates, open free after ordinary registration. If you want to try with no outlay at all, that is where to start.
---
Where to start today
One action, ten minutes.
Find one photograph at home that is too precious to lose. Not the most valuable one — for a first attempt take the second most important, so you are not anxious about the result.
Photograph it in daylight by a window. Upload it to the assistant and write one line: "write a prompt that will restore this photograph".
Send the text you get to the generation section.
Did it work? Take the next one. The second takes a couple of minutes, because you know the whole route. And after that you can take the one you were afraid to touch.
If the print is small or blurred. The same section has a separate resolution increase — it pulls out details barely visible in the original. Useful before printing: old photographs often survive only in a small size. The operation costs from 12 cents.
Registration is free and opens three days of full access.
---
What to read next
[Removing an unwanted object from a photograph](/en/blog/remove-object-from-photo) — the second task in this group.
[Where to start: one evening, one task](/en/blog/first-evening-one-task) — if this is your first approach to the subject.
[Where does what I write to an AI go](/en/blog/is-it-safe-to-use-ai) — if uploading family photographs is off-putting.
---